In this course, it is mandatory to prepare assignments in accordance with the same principles as the bachelor’s thesis, which follows the practices of academic writing. Similar requirements may appear in various other courses throughout your studies.
To support you in this process, we have prepared a simplified set of guidelines designed to help first-year students use the thesis template and write reports. The guidelines also highlight common mistakes and provide examples of correct formatting.
This guide is not designed to replace the complete thesis guidelines, but sufficient enough to cover most reports during your studies.
For the programming courses, we have modified the thesis template to create a simplified version, suitable for presenting reports. Each chapter includes instructions to help you form the final work. Therefore, it is recommended to use the provided template. The customized template is available for MS Word, which is why this guide focuses primarily on using MS Word.
When writing your report, do not place the document in Google Drive – this will ignore almost all formatting rules and corrupt the template.
Title page
When preparing the title page, please pay attention to the following
- Type of the work – within the Programming course, students are required to prepare a homework report. Therefore, the type of the work should be Report or Homework Report
- Traditionally, the supervisor’s academic degree is placed under their name. If the degree is not known, it is acceptable to include their job title instead (this information can be found by searching for the employee on https://taltech.ee/en/)
- Year at the bottom of the title page – many templates contain a fixed year by default. Make sure the year corresponds to the current year. Pay special attention to this when submitting work after the turn of the year.
- The lines at the top of the page indicate to where the work is submitted to. Since the Programming course belongs to the School of Information Technologies, this is correct. However, if you are preparing work for a Physics or Mathematics course, it will most likely belong to the School of Science.
Author’s declaration of originality
When preparing the author’s declaration, make sure that the date and the work type are correct. If you are using the official template, the word thesis needs to be replaced.
Abstract
In this course, reports do not require an abstract. If you prepare your report using the thesis template, the abstract chapters (in Estonian and in English) must be removed from the template.
Chapters
The most important rule when formatting headings is to use the built-in styles when creating new chapters. For headings, both numbered and unnumbered headings are used. Unnumbered headings are divided into two categories:
- The Heading style is used for the author’s declaration, the abstract (not required in this course), the list of abbreviations and terms, and the table of contents
- The Heading_unnumber style is used for the list of figures and the list of tables
Note! Although the settings for unnumbered headings are the same, it is important to follow the correct styles – otherwise, the headings displayed in the table of contents will not meet the requirements.
Numbered headings are used for all sections from the introduction to the conclusion.
- Heading 1
- Heading 2
- Heading 3
Each heading created must be followed by written content. In other words, a first-level heading must be followed by substantive text (at least three sentences), after which a second-level heading may follow. Similar rule also applies to tables and figures – You need to introduce your chapter with text, before including a table or a figure. Having a next level heading directly following a previous heading is considered a mistake.
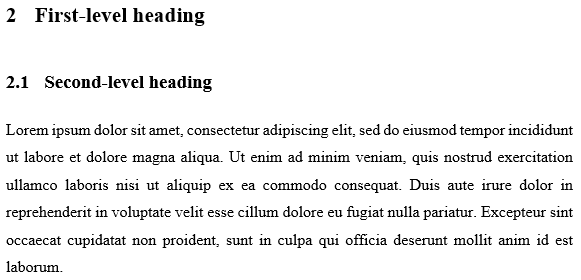
Figure 1. Heading without content.
Body text
Each chapter must contain meaningful text. The text must be divided into paragraphs, and the simplest rule to follow is “new idea = new paragraph.” Each paragraph must consist of at least three sentences.
The Body Text style is used for writing the main content. If this style is not immediately visible in the style selection menu, it can be found under Apply Styles or by expanding the Style menu (Figure 2).
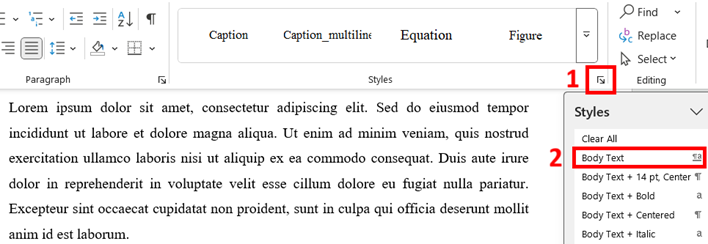
Figure 2. Displaying styles.
Creating a new first-level chapter and using page breaks
Word includes multiple types of page breaks. The simplest of these is the page break (shortcut ctrl + enter), which is recommended when the content would otherwise appear unnaturally on the page – for example, if only one or two lines of text or a table header would fit at the bottom of a page. In such cases, it is better to start the content from the top of the next page, and using a page break is appropriate.
To add a new first-level chapter in the report, you must insert a break that contains a section boundary. To insert a section break, select Layout → Breaks → Section Breaks → Next Page, as shown in figure 3.
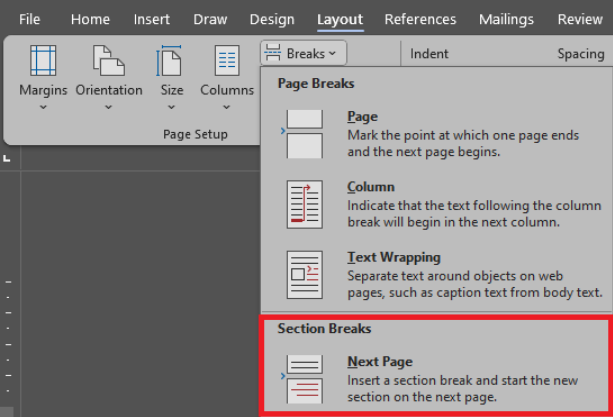
Figure 3. Inserting a section break for s new first-level heading.
Using the wrong type of break results in a formatting error. Figure 4 shows two adjacent pages in MS Word: on the left, the heading is formatted correctly, while on the right, the heading is incorrectly formatted. The incorrect formatting is caused by using a regular break instead of a section break. A correctly formatted heading is preceded by a 60-point empty space, which is missing from the heading on the right.
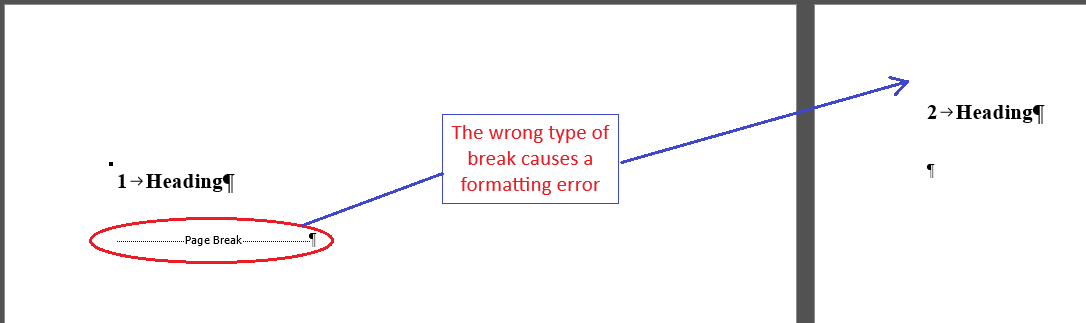
Figure 4. First-level heading formatting error.
Formatting the body text
When formatting your report, avoid creating large blocks of text ( walls of text) that may cause the reader to lose focus. Divide your work into reasonably sized paragraphs and organize them under appropriate headings. Do not hesitate to use subheadings to further structure the content.
In addition to dividing the text, remember to illustrate your work with figures – for example, an algorithm, etc. A picture is worth a thousand words.
Alongside figures, make sure to use tables and different types of lists where appropriate. If certain content can be presented in a structured way as a table or a bullet list, it will be much clearer and easier for the reader to understand.
Figures
When adding figures, first make sure that the figure is print-ready – i.e., the quality is sufficient so that it is not blurry, and when the report is printed on A4 paper, the figure must remain legible. If a figure requires a 200% zoom on a computer to be readable, it needs to be redesigned. If you want to be especially thorough, also consider whether the figures will remain comprehensible in black-and-white printing.
Unreadable figures are one of the most common ways to lose points.
All figures must be horizontally centered on the page. Each figure must have a caption placed below it. The caption must appear on the same page as the figure itself. Captions should be added using the built-in functionality – by right-clicking on the figure and selecting Insert Caption, as shown in figure 5.
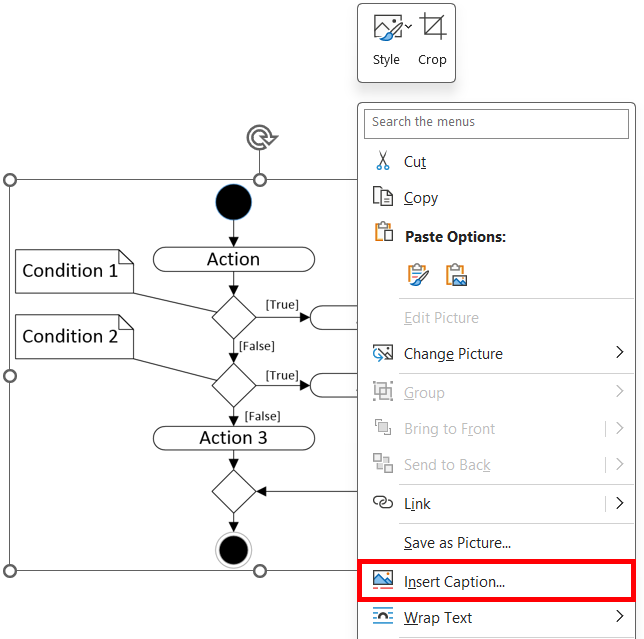
Figure 5. Inserting a caption to a figure.
In the dialog box shown in figure 6, you must provide a caption that describes the content of the figure. Don’t forget to add a dot at the end of the figure number and the caption itself, make sure there is a space between the dot after the figure number and the first letter of the caption text. The caption must be placed below the figure. If the figure is taken from third-party sources (e.g., the internet), a reference to the source must be included in the caption as well. More on this can be found in the referencing chapter.
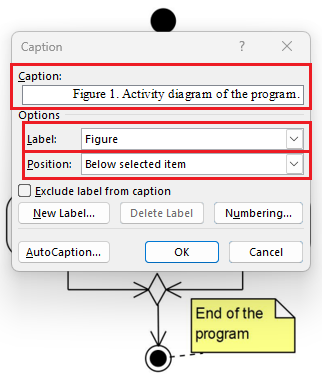
Figure 6. Assigning a caption to a figure.
All figures included in the work must be cross-referenced in the text. Moreover, the reference to the figure must appear before the figure itself! Hopefully, you noticed that this writing guide also contains cross-references to figures. For example, the sentence immediately following this one contains a cross-reference to the seventh figure. To insert a cross-reference, use the dedicated Cross-reference button on the toolbar (Figure 7). Additionally, keep in mind, that if a figure is at all complex, it must be further explained in the text!

Figure 7. Insert cross-reference in MS Word.
In the dialog box that opens, shown in figure 8, you must select the type of object to which you want to add a cross-reference. Then choose the desired format and the object to be referenced. After inserting the figure by clicking the Insert button, adjust the inserted text to the correct grammatical case.
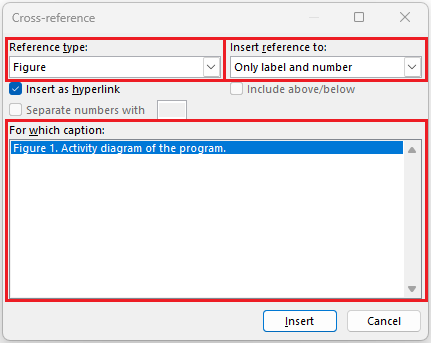
Figure 8. Selecting the object to be referenced.
The reason for making “so much” effort is simple. It in fact saves you time in the long run and ensures the correctness of document references. All figures must be numbered consecutively. If a new figure is added before the last existing figure in the document, all subsequent figures must be renumbered. If cross-references were written manually, you would also need to manually update all figure numbers in the text. A savvy user does the following: presses ctrl + a and then F9. This updates all reference numbers in the text automatically. https://support.microsoft.com/en-us/office/update-fields-7339a049-cb0d-4d5a-8679-97c20c643d4e
Program code
It is only appropriate to include program code in the report if it supports the main text. For example, when the author describes a special edge case of the program, and the code would help the reader understand the text more clearly.
In the Programming course, program code generally does not need to be included in the report, as it is submitted in a separate file!
Program code in the main part of the report
In the main part of the report, avoid including long sections of program code. Only short code snippets that were essential for achieving the results and that add value to the written text may be included in the main part. The main part must not contain the entire source code, especially if it spans multiple pages. Longer code listings should be placed in the appendices of the report. Whenever possible, avoid presenting program code in the main part of the work! It is much more professional to present a UML activity diagram. In a more relaxed setting (outside of this subject), it would still be preferable to present the algorithm as a diagram, such as a flowchart, instead of plain code.
Program code as an appendix
Longer sections of program code may be presented in the appendices of the report. The program code formatted as an appendix must be referenced in the main part of the report using a cross-reference. For more on adding cross-references, see the referencing chapter.
Depending on the course requirements, the full code in the appendix may either be mandatory or it may be sufficient to provide a reference to a code repository, such as GitHub or the university’s internal GitLab. In the context of this course, the code file(s) must be submitted separately, so there is no need to include them in the appendix.
Formatting program code
The inclusion of program code is handled similarly to the inclusion of figures in the previous chapter. Program code is captioned as a figure and cross-referenced.
The code presented should, if possible, fit on a single page and be displayed in a monospaced font with single line spacing. In the homework template, a separate style called Program_code has been created for this purpose, as shown in figure 9.

Figure 9. Properly formatted program code.
The program code must be properly indented and follow coding style requirements, just as expected in class. Although the program code is presented as a figure, it must be aligned to the left edge of the page.
As the final step, a caption and a cross-reference need be added. To do this, you can select your program code with the mouse and then choose Insert Caption from the References menu (Figure 10).
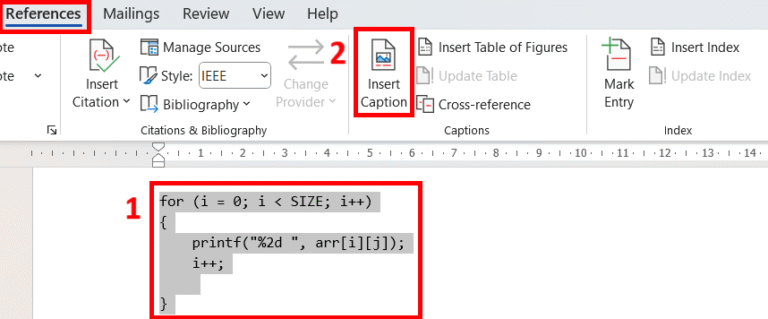
Figure 10. Adding a caption to program code.
Tables
The formatting rules for tables are similar to those of figures. All tables must be horizontally centered on the page, including the table title, provided it fits on a single line. The title of the table is placed above the table and added in the same way by using Insert Caption, but selecting the type “Table”. A cross-reference to the table must also be included in the text. If necessary, the data presented in the table should be further explained in the text.
For formatting column or row headings in a table, use the style Table_head, and for the table contents, use the style Table_text. The Text in a table is typically left-aligned and numbers are right-aligned. As an exception, some content can be center-aligned, if it doesn’t affect readability. For decimal numbers, make sure that the decimal places are aligned; if needed, add extra zeros at the end of the number. A correctly formatted table is shown in figure 11.
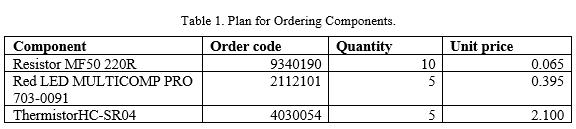
Figure 11. Correctly formatted table.
Tables must be arranged so that they fit on a single page. If this is not possible and a table extends over multiple pages, the header row must be duplicated on the following page. Like figures, tables must also be print-ready.
Table of Contents and Lists
At the beginning of the report, there are three lists – the Table of Contents, the List of Figures, and the List of Tables. All three lists are generated, not composed – meaning that as the author, you generally have no reason or justification to edit them manually.
For everything to work automatically, it is important that you have consistently used the correct styles and functions while writing your report – e.g., figure captions must be added using the Insert Caption button with the type set to Figure, for tables, the type must be set to Table, and for headings and subheadings, Heading 1, Heading 2, etc. must be used.
To automatically update all lists and cross-references, first select the entire document with ctrl + a, and then press F9. For each list that contains new items, you will be asked whether you wish to update them. You should confirm this, as shown in figure 12. Be sure to refresh all references in this way before saving your report as a PDF! Otherwise, you may end up submitting your work with, for example, an incorrect table of contents.
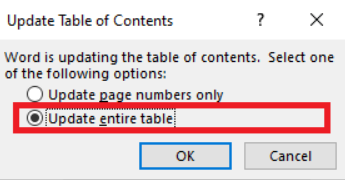
Figure 12. Updating lists.
Updating Lists Individually
It is also possible to update the lists individually. To do this, right-click on the list that needs updating and select Update Field, as shown in figure 13. From the options that appear, you can choose whether to update only the existing elements (updates page numbers and headings) or to update the entire table, which will also include new subchapters, figures, or tables that were not previously in the list.
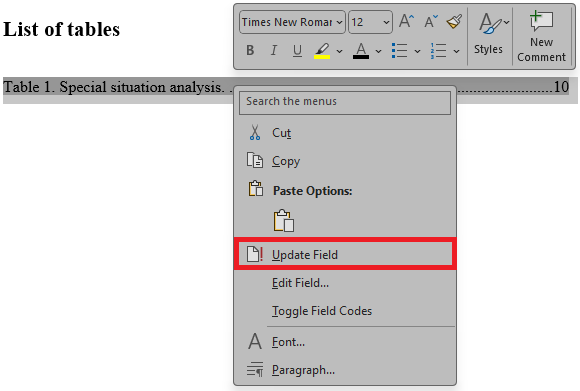
Figure 13. Updating a list individually.
Referencing
All rules and guidelines on writing references have been provided by the faculty under “Guide to using sources”. This includes topics like when are you allowed to use AI without referencing and when it is mandatory to reference use of AI. Guide can be found here: https://taltech.ee/en/thesis-and-graduation-it#p43359
Referencing should begin with collecting the references. It is wise to save the references you use while working. For example, if you need a more complex algorithm for a program code that you copy from the internet, also copy the exact web address and add it as a comment, so that it will be easy to find later. This way, it will also be easier for you to write the paper afterwards. All external sources used in the work must be referenced. If a reference is missing, the work is considered plagiarism, which universities pay special attention to.
Storing and Using References
Additional applications are often used for storing references, but today we will look at a simple case using MS Word. To manage references, open the menu References → Manage Sources, as shown in figure 14.
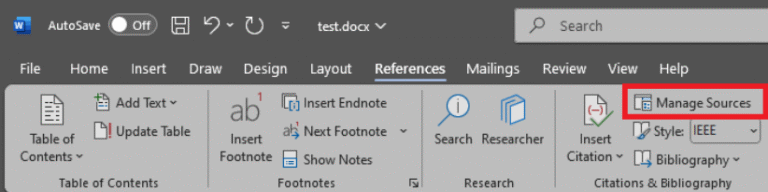
Figure 14. Managing References.
In the dialog window that opens (Figure 15), you can manage all references (on the left) and those that will be added to the bibliography of the current work (on the right). In the submitted work, all references must be used – this is visually indicated by a check mark in front of each item in the list.
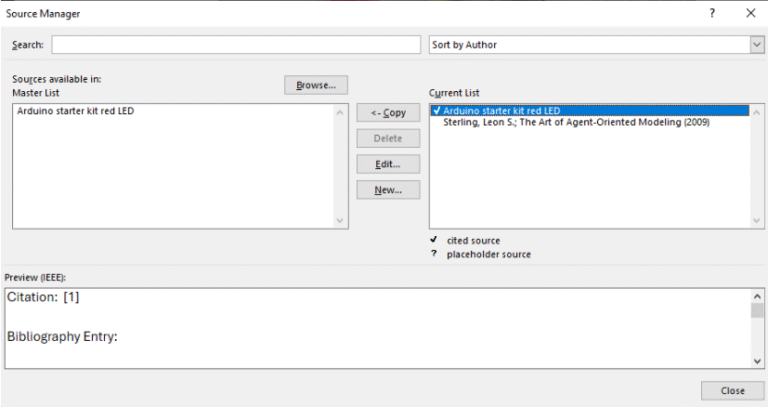
Figure 15. Managing references.
Adding a reference
To add a reference, use the Insert Citation button in the References section, shown in figure 16, and select the reference from the list.
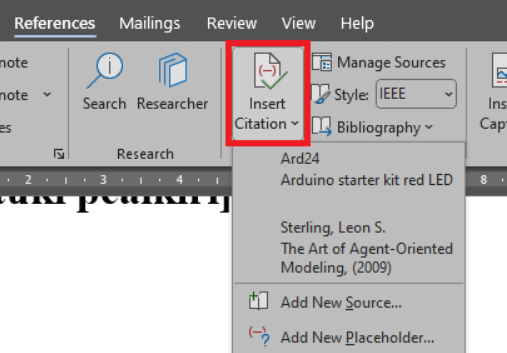
Figure 16. Adding a reference.
Finally, a short list of notes related to referencing
- All references listed in the bibliography must also be used in the text. If you used a reference but did not cite it in the text, this is plagiarism. On the other hand, if your bibliography contains references that were not used, this is false inflation. Referencing publicly well known facts is also be considered false inflation of references.
- References must be listed in the same order in which they appear in the work. MS Word can do this for you. To automatically update all references, do the same as with lists – select the entire document with ctrl + a and then press the F9 key to update.
- References must point to the specific source, not just the homepage of a website. For example, if you want to reference the formatting guide for final theses of the TalTech IT faculty, a link to https://taltech.ee/en/ would be meaningless. However, the link https://taltech.ee/en/thesis-and-graduation-it would be appropriate, as it points to the correct subpage containing the thesis formatting guide and author kit.
- If you used an AI-based code generator to produce code, you must clearly specify which part of the code was generated. A general reference, such as to OpenAI ChatGPT, together with the note that it was used for code generation, is insufficient – it does not clarify to what extent and which parts of the code were generated, and which parts were written by the author.
Use of generated content and referencing it
Artificial intelligence may be used in academic work. In the report, you do not need to reference AI if it was used for
- Improving the wording or translating your own text
- Gathering ideas
You must reference AI if
- You used generated images, text or code
- You had a language model rephrase another author’s text
Read more: https://haldus.taltech.ee/sites/default/files/2024-04/Guide%20to%20using%20sources%2016042024.pdf [p. 5]
Appendices
When formatting appendices, the general formatting rules must be followed. Each appendix is placed on a separate page using an unnumbered first-level heading (heading_unnumber). Appendices are numbered manually in consecutive order using Arabic numerals. A dash is placed between the appendix number and the appendix title. All appendices included in the work must be referenced in the main part. For example: Appendix 1 – Program Source Code.
It is reasonable to place in the appendices more extensive material that is not suitable for inclusion in the main part of the report but is important for understanding or verifying the results of the work, etc.
In the thesis template, there is an appendix titled Non-exclusive license, which is mandatory for theses but unnecessary in reports. This may be deleted.