You are currently running Windows and want to try out Linux, but don’t know much about running other operating systems? Want the easy answer? Jump to Installing Ubuntu in a VMWare Workstation Pro.
Want to know how deep the rabbit hole goes? This page contains a lot of extra information that might be interesting to some, while completely unnecessary for most.
Picking a Linux distribution
While Windows and MacOS just have a single distribution, Linux is mostly open source and has lots of distributions. Mapping all of them is nearly impossible, but there are some major key players out there whose distributions are worth keeping an eye out for.
Major Linux distributions: https://distrowatch.com/dwres.php?resource=major
There is no way to say which Linux is the most popular, as there is no one statistic. There is also no best Linux distributions, it depends on the needs of the user. As a cherry on top, the currently trendy distribution(s) change over time.
The recommendation that the course is going with is Ubuntu and also distributions based on Ubuntu. This is because it’s well supported by enterprise software and has a large userbase, supported by a lot of documentation and a good knowledge base. It’s a long-standing distribution, that has been around for ages. Ubuntu hasn’t got any superpowers and isn’t the best at any particular area, but it is a well-rounded distribution that can do almost everything reasonably well. While lately (2022+) the sentiment is changing due to packaging decisions of applications and slow update cycle, it is still a pretty decent distribution to get your feet wet.
As for distributions based on ubuntu (work the same, look and feel different), my personal preferences are
- Kubuntu – This is a flavor of Ubuntu, meaning you get the great compatibility and support resources, but it has a different desktop environment (KDE), that in my opinion, is the better option.
- Linux Mint – This is based on Ubuntu (not a flavor), so it still has the great compatibility and support. This is built to offer the easiest transition for Windows users, so it should feel quite comfortable. It also does away with some of the Ubuntu controversies around packaging applications.
The more savvy users usually grow out of Ubuntu and its flavors and derivates for something that works better for them. Fans and hardcore users tend to look towards Arch and Gentoo, but also EndeavorOS. Mainstream options for general use are Linux Mint, Kubuntu and Fedora.
Note, that none of the currently trendy distros are listed, because often come and go. List is focused on long-standing distributions that have a reputation for stability and support. Regardless, if you are interested, you are encouraged to explore around with the latest and greatest.
Which Linux distributions do your teachers use?
The lab computers have OpenSUSE Linux. This is because of enterprise compatibility and support. It’s not the Linux I would recommend for everyday use for beginners.
Your teachers and teaching assistants are mainly using either Ubuntu, Kubuntu and EndeavourOS. Some of us used Mint as our previous distribution.
Guest lecturer that we use from time to time is running Arch Linux.
Most of us also are running various microcomputers and servers running CentOS, Debian, Raspian, Ubuntu Server, etc.
Various ways of running Linux
To run Linux on your own machine, there are lots of different ways. Some easy, some hard and can potentially break your software setup (including your current OS). Next up we’ll take a brief overview of the common methods. The recommendation for beginners is running it in a virtual machine.
Running in a virtual machine
This is the simplest way of doing it. It will retain your current system fully, while only installing some additional drivers such as a network driver for the VM. The software will create a virtual computer inside your host operating system and share the resources of your computer to run it.
+ It doesn’t have any long-term effects and can be easily removed from your system.
+ It creates a sandbox in your device that you can play around with. No worries if you break it.
+ You can easily snapshot the current state of the machine and restore to a previous snapshot.
+ Virtual machines can be copied over to other computers as well as put into remotely accessible servers
+ No need for an extra computer or risky alterations to the host operating system
– Slower than running on native hardware
– Runs better on specific hardware that has virtualization features
– Requires more powerful hardware, as your computer has to run both your host and the virtual machine.
– Inconveniences caused by this not being your main OS (e.g. transferring files, clipboard between host and VM)
Most used free options for type 2 hypervisors:
- VMWare Workstation Pro and VMWare Fusion Pro (https://www.vmware.com/products/desktop-hypervisor/workstation-and-fusion#compare). As of 2024 after Broadcom merger, the Pro versions of these applications have been made free personal use. VMWare is a recognized and widely used virtualization software brand.
- Oracle Virtualbox (https://www.virtualbox.org) – free software that is feature-rich and powerful. Is available on all major platforms.
- Microsoft Hyper-V (https://learn.microsoft.com/en-us/virtualization/hyper-v-on-windows/about/) – Hyper-V virtualization support is available for client devices starting from Windows 10. It additionally requires either Pro, Edu or Enterprise version of Windows and a 64-bit distribution. It may be suitable for some as it is already built in to the software they might be running.
Installing Ubuntu in a VMWare Workstation Pro
Teacher’s note: Even I’ve written guide is written for Ubuntu, I’d recommend checking out Kubuntu and Linux Mint as well before downloading Ubuntu. Some might prefer the user interface of those over Ubuntu.
To better understand the requirements, keep the following in mind:
- You are running two operating systems in parallel – both will require resources to function.
- Minimum means it will work, but will be annoying. Recommended means that annoyances will be minimal, but it will still be a virtual machine, the performance will not be the same as running natively
- The CPU and RAM will only be used while the VM is running. The set resources are also shared- i.e. if the VM is currently not using up to the maximum limits allowed, they will still be available for the host.
- Once you shut down the VM after work, all resources will be usable by your host system.
- HDD/SSD space will be used until you delete the virtual machine disk, even while the VM is shut down.
- Requirement recommendations are made for modern feature-rich distributions. If you are low on resources, you can use a light-weight Linux distribution such as Lubuntu.
Requirements:
- Minimum 20 GB, recommended 25 GB of free disk space for the virtual machine on your hard drive, preferably on SSD.
- Minimum 4 GB, recommended 8 GB of system RAM for the virtual machine. Your computer should have at least 4 .. 8 GB extra left over for Windows to survive underneath. If you are low on RAM, using a lightweight distribution instead is recommended (e.g. Lubuntu) – lightweight Linux distributions can work with as minimal as 2 GB of RAM.
- Minimum 2 CPU cores, recommended 4 CPU cores for the virtual machine. Recommended 6-core or better for host system.
- Processor needs to support virtualization and it needs to be enabled. Note: if you don’t have virtualization support, you can try Virtualbox. It behaves quite similarly to the recommended VMWare Workstation..
Before you can start installing Linux, you need the hypervisor in which the virtual machine will run.
- Download VMWare Workstation Pro for non-commercial use:. There are two ways to download:
a) https://www.vmware.com/products/desktop-hypervisor/workstation-and-fusion – the official links are available here. They will require you to sign up for a Broadcom account before allowing the download.
b) Search for an alternative source for the download. One reputable source is TechPowerUp https://www.techpowerup.com/download/vmware-workstation-pro/ - Install the hypervisor VMWare Workstation Pro
- Download the Ubuntu Linux Desktop disc ISO: https://ubuntu.com/download/desktop
It’s usually recommended to download LTS (long-term support) version of the operating system. LTS is a stable version that has major updates every 2 years and a long support window for every version. This keeps the system very stable, but it can get outdated compared to the latest and greatest.
Now you are set to start installing Linux.
NB! Make sure to be plugged in when using a laptop or have plenty of charge in your battery.
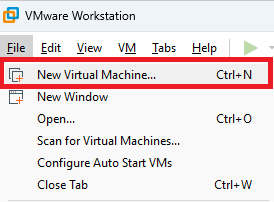
Launch VMWare Workstation. Create a new virtual machine.
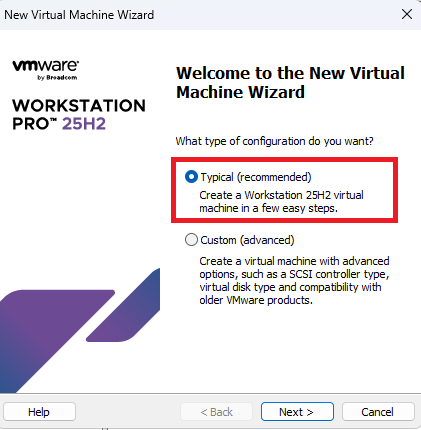
Unless you have specific requirements, use the typical configuration.
Select the Installer disc image option and locate the Linux installation media (iso file) you downloaded.
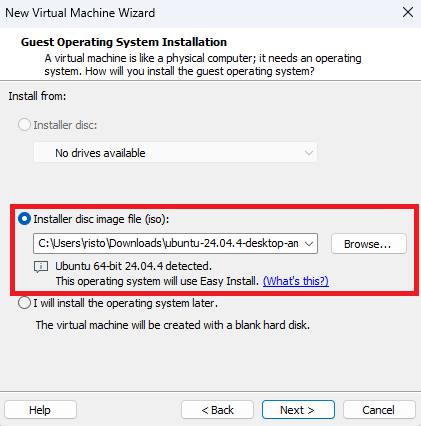
Note: This should go through the automated installation using Easy Install. However Ubuntu updated their installer with the latest version (24.04) and as of right now, automated install isn’t supported. However giving it the ISO will simplify the setup for us so we’ll keep it on.
Next page will ask you for the Linux account for the automated install. At the time of writing (Ubuntu 24.04.4 and VMWare Workstation 25H2) it isn’t working, however you must fill it anyway. If you follow this tutorial later in time, it may start to function.
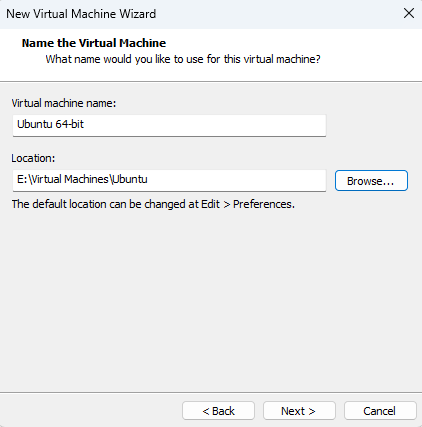
Next up, you need to select where the storage location for this virtual machine 2 things to note here
- It’s recommended to store it on an SSD
- It will take roughly 10~15 GB of memory in that location initially and it can grow up to the limit you will set in the next page.
- Careful with the location, you do not want to put it on a location where it will start automatically syncing to dropbox, onedrive or any other cloud platform.
 Next up, you need to select the maximum drive size for your virtual computer. The default settings are fine for most people. This is the maximum allowed size that the system can use with all the software you will install to it. If you intend to install a lot of software, give it more space.
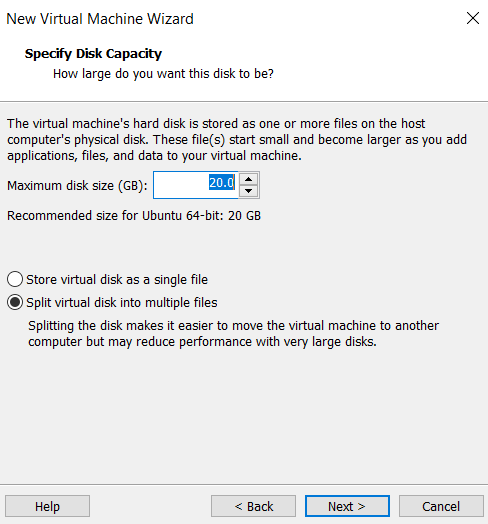
Note 1: This is the maximum size. Initially after installation, it will be roughly 6 GB. The size of the files will grow as you use more space on the virtual Linux machine, up to the maximum size. You can make it smaller, but I do not recommend anything less than 20 GB.
Note 2: Resizing the disk to a larger size later is possible,but it’s tedious to say the least.
Next up is the overview of the configuration that you are about to create. If you missed something or want some last minute change or checkup, this is where to do it. This is also where you can allow your virtual computer to use more RAM or CPU cores to make it faster if you have enough resources on your own computer. Many settings can be adjusted later as well.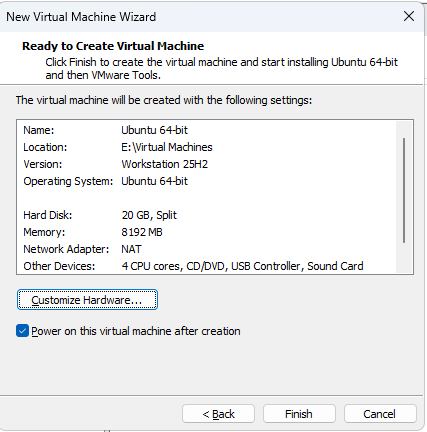
To alter the settings, use Customize Hardware. Minimum that should still work is 2 GB and 1 core. Reasonable experience can be with 4 GB and 2 cores. In the example above, I’ve increased the amount of ram to 8 GB and permitted use of 4 CPU cores for a relatively decent experience.
Keep in mind, that
- Your resources will not be used while the virtual machine is suspended or shut down.
- These resources are shared. You don’t actually lose that much when running the machine, it’s the maximum that the machine can use if fully stressed.
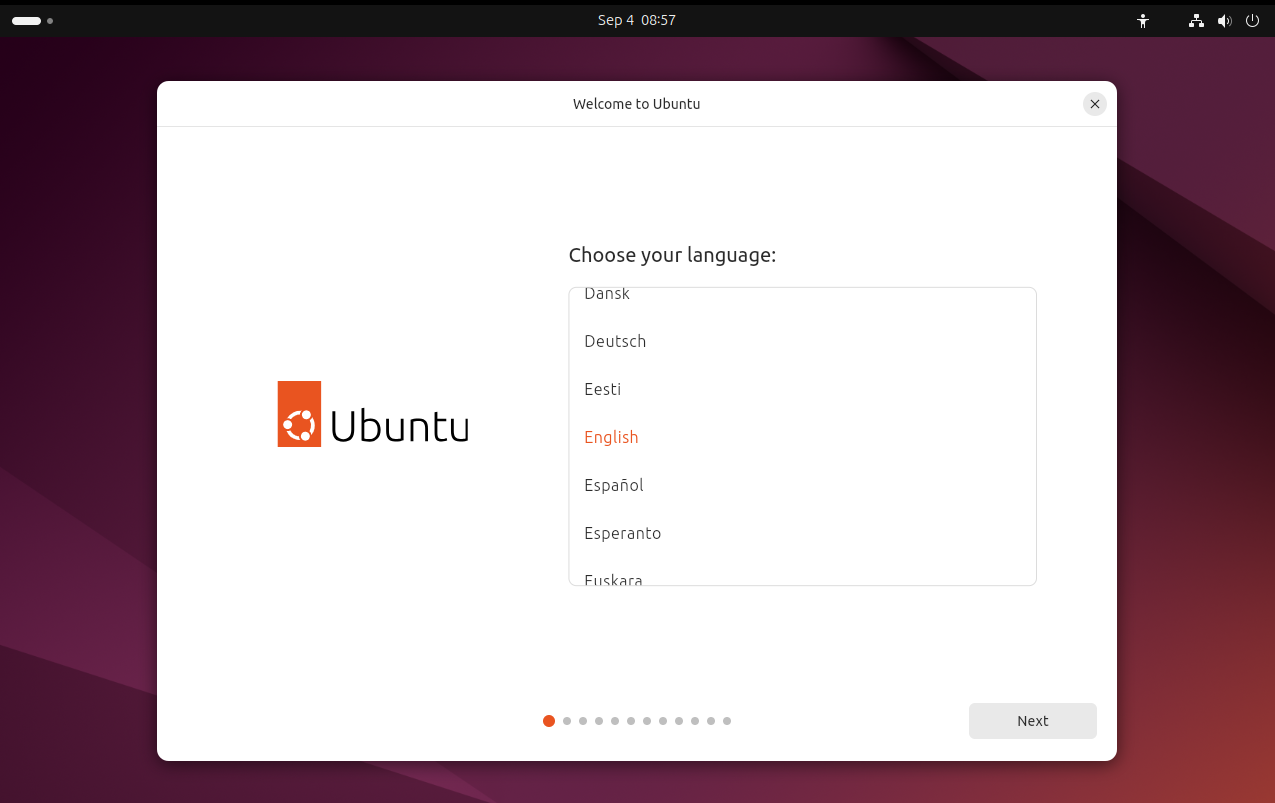
Now the virtual machine will power itself on and start the installation of the operating system. You will be asked to setup the device in the beginning of the install – your installation language, username, password, keyboard language, timezone etc.
For how to set up the hard drive, as long as you are running it in the virtual machine as instructed per this guide, you can use the default (wipe everything). Do not use this setting if you are setting it up for dual-boot, as that will wipe your other operating system and its data.
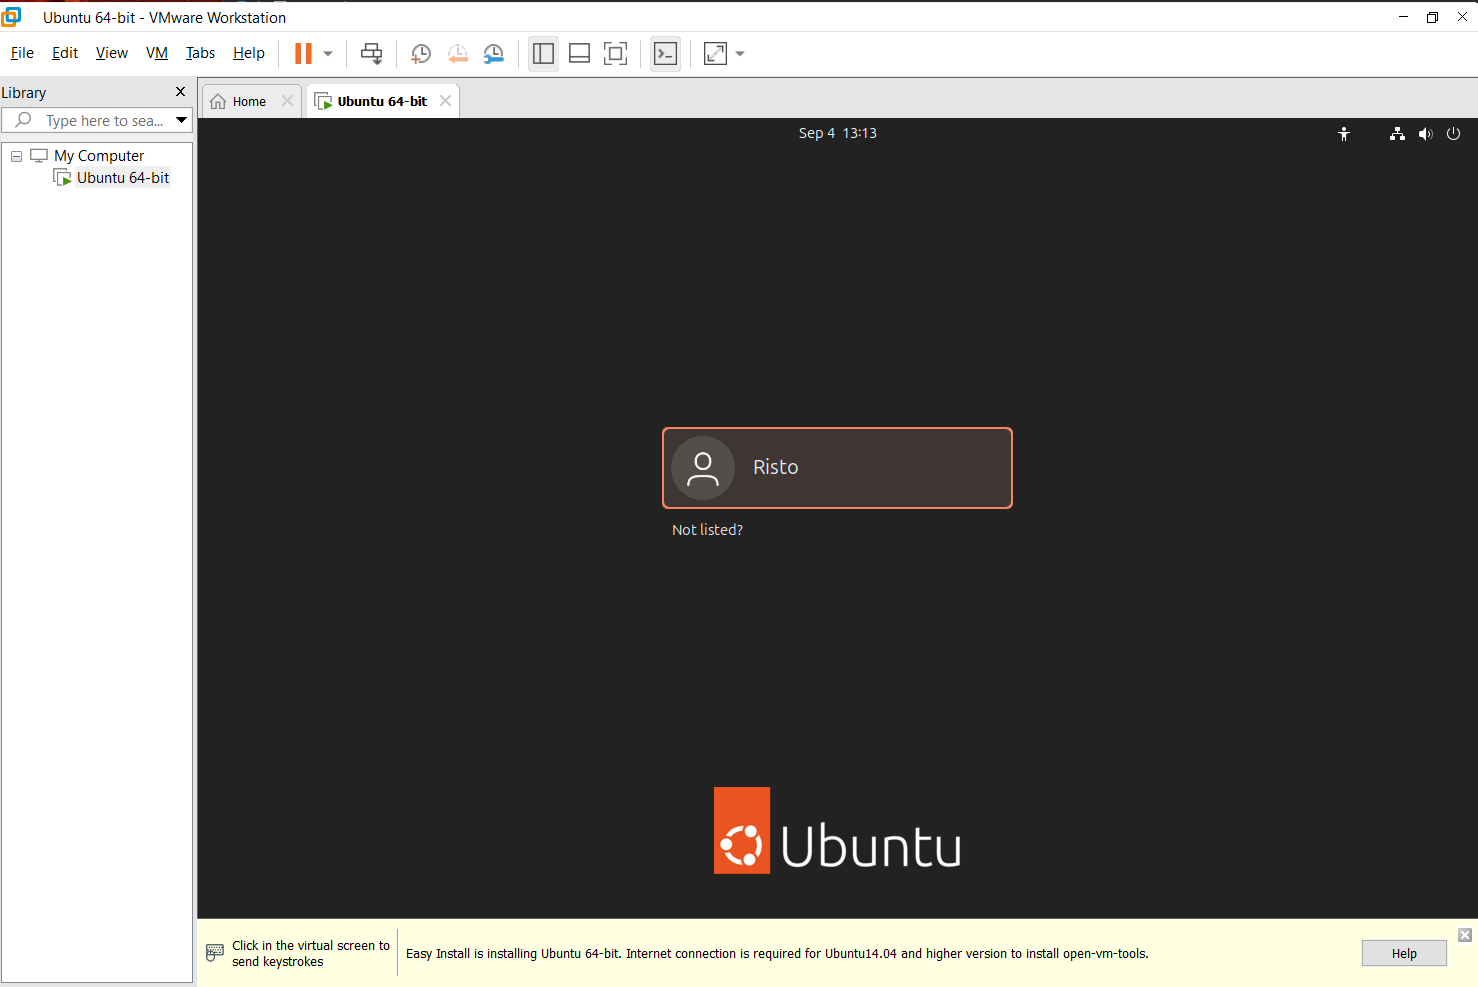
Now you need to wait for the install complete. Depending on your computer, it should be 5 to 10 minutes. Once done, you will be asked to restart the computer, after which, you can start using the system.
!!NB!! If You installed the virtual machine on your laptop, make sure to turn off the virtual machine before allowing the laptop to go to sleep (do not close the lid of the laptop). If the host goes to sleep or shuts down unexpectedly while the virtual machine is running, it can corrupt the file system of the virtual machine. This means you will lose all data in the virtual machine and will need to reinstall it.
Next up
- Go through the initial welcome wizard.
- Perform a system update. Don’t worry, Linux updates are nothing like Windows updates – they are actually nice.
- Go play around and also start the installation process for software required for the course.
- Recommended: Set up a shared folder between your computer and the virtual computer.
Hint 1: If the virtual machine doesn’t fill the entire window, then resize the window manually and it should readjust itself. Then you can maximize it again. If it doesn’t work, make sure that VMWare Tools is installed in the virtual machine.
Hint 2: To release your mouse, hit ctrl + alt.
Setting up shared folders
In order to make your work smoother, you may want to create shared folders between your host and guest systems. This way you can access the same files in both operating systems.
To do this, choose Player -> Manage -> Virtual Machine settings. Open the second tab (Options) and select shared folders. Turn the function on and add the folder(s) you need.

Under linux, you will find all of the shares from
/mnt/hgfs/ . Hint: If the location is inconvenient, you can create a shortcut (symbolic link) to somewhere else. To create it to the desktop based on my example, type
ln -s /mnt/hgfs/programming_1 ~/Desktop/programming into the terminal. This will create a shortcut folder called
programming on your desktop.
Hint: If the location is inconvenient, you can create a shortcut (symbolic link) to somewhere else. To create it to the desktop based on my example, type
ln -s /mnt/hgfs/programming_1 ~/Desktop/programming into the terminal. This will create a shortcut folder called
programming on your desktop.
NB! Known bug! After you restart your virtual machine, shared folders will no longer show. There is a temporary and a permanent solution to this.
Temporary: Go back to the shared folders setup. Turn it off and then on again. This works until you restart the virtual machine.
Permanent (more complicated): You need to edit the fstab file under Linux. Open /etc/fstab in a text editor with root privileges (e.g. sudo nano /etc/fstab ). Go to the end of the file and add vmhgfs-fuse /mnt/hgfs fuse defaults,allow_other 0 0 .

Since VMWare documentation access is now limited by Broadcom, this is the source I used https://www.configserverfirewall.com/ubuntu-linux/vmware-shared-folder-ubuntu-vm/
Running off a USB drive
This is most likely the least popular option. It means that you install an operating system on a USB drive.
Linux allows you to run it of a USB drive natively. This is the default behavior to allow you to test Linux and possibly also fix some issues on the device. However any modification will typically be erased. To avoid this, many bootable USB creators allow you to create persistent storage. This will allow you to permanently use the storage on the drive and install programs that will remain on the next boot.
To run a thing like this, the computer boot device needs to be altered to USB. This can be done using the BIOS/UEFI or the quick boot menu provided by them. This is often unavailable on corporate machines due to security concerns.
+ You can run your own preferred software on any machine that allows you to boot from USB
+ No need to deal with boot loaders or partitioning hard drive space. Everything is contained to your drive.
– Often unavailable on properly configured corporate computers because it can bypass their security
– USB memory sticks are horribly slow and unreliable.
Dual-booting
This method will install a secondary operating system on your computer. It is just like in the computer class – when powering up or restarting the computer, you are greeted with the operating system selection – do you want Windows or Linux?
This is usually the preferred option for people who use multiple operating systems for prolonged time (e.g. Linux for work, Windows for gaming).
Even though modern Linux installers are quite friendly and offer to install as a second operating system, it is still very easy it is to break your existing operating system and/or lose your data, no tutorial will be provided. You have been warned!
+ The operating systems are independent of each other
+ There is no performance penalty as you are running a single OS directly on the hardware
+ There are a lot less compatibility issues and quirks running on native hardware.
– Need to reboot to switch operating systems
– Accessing other operating system files may be difficult
– Windows tends to be rude and break everything twice a year when it updates. It likes being the only child in the family.
– Need to re-partition your disk and keep a separate boot loader